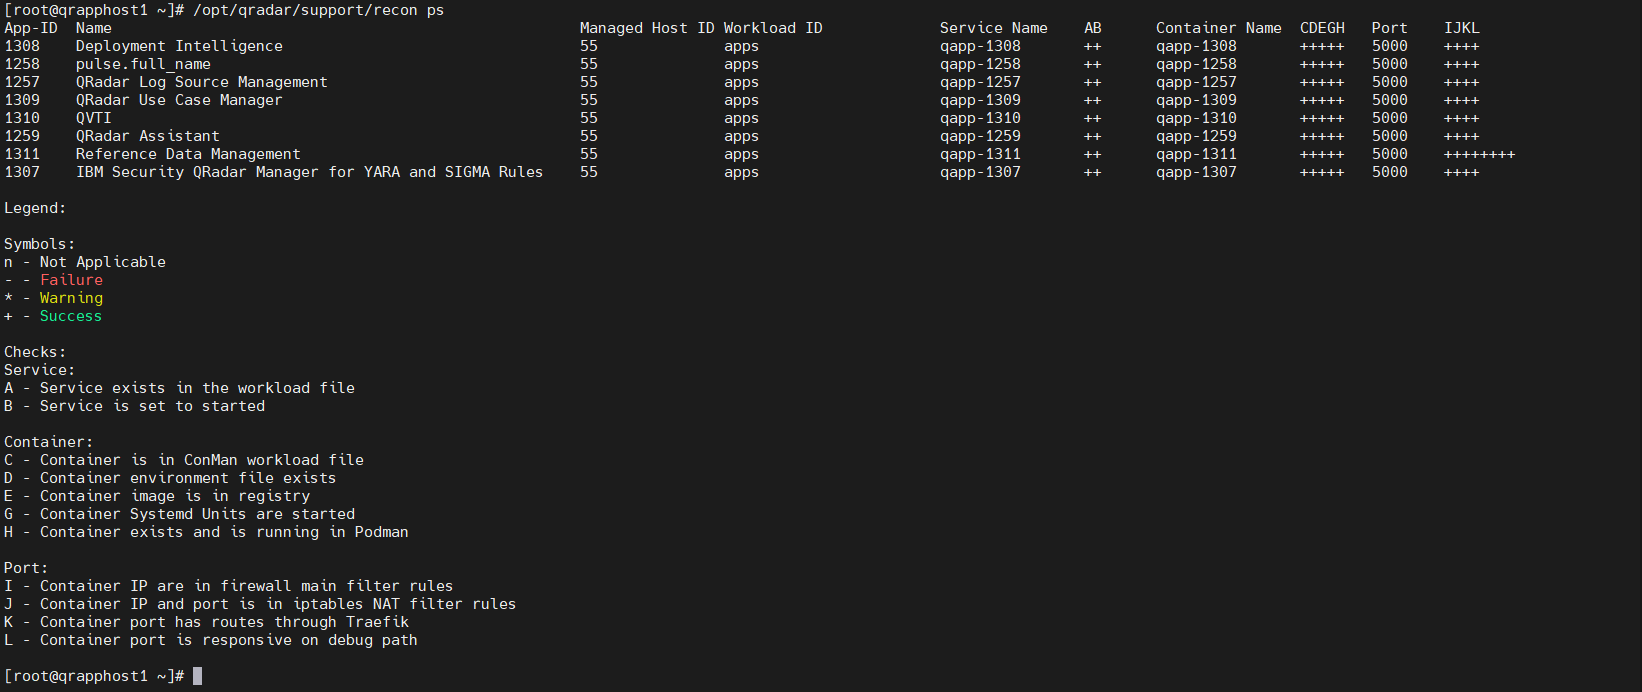
1. The issue: Recon cannot communicate with the API
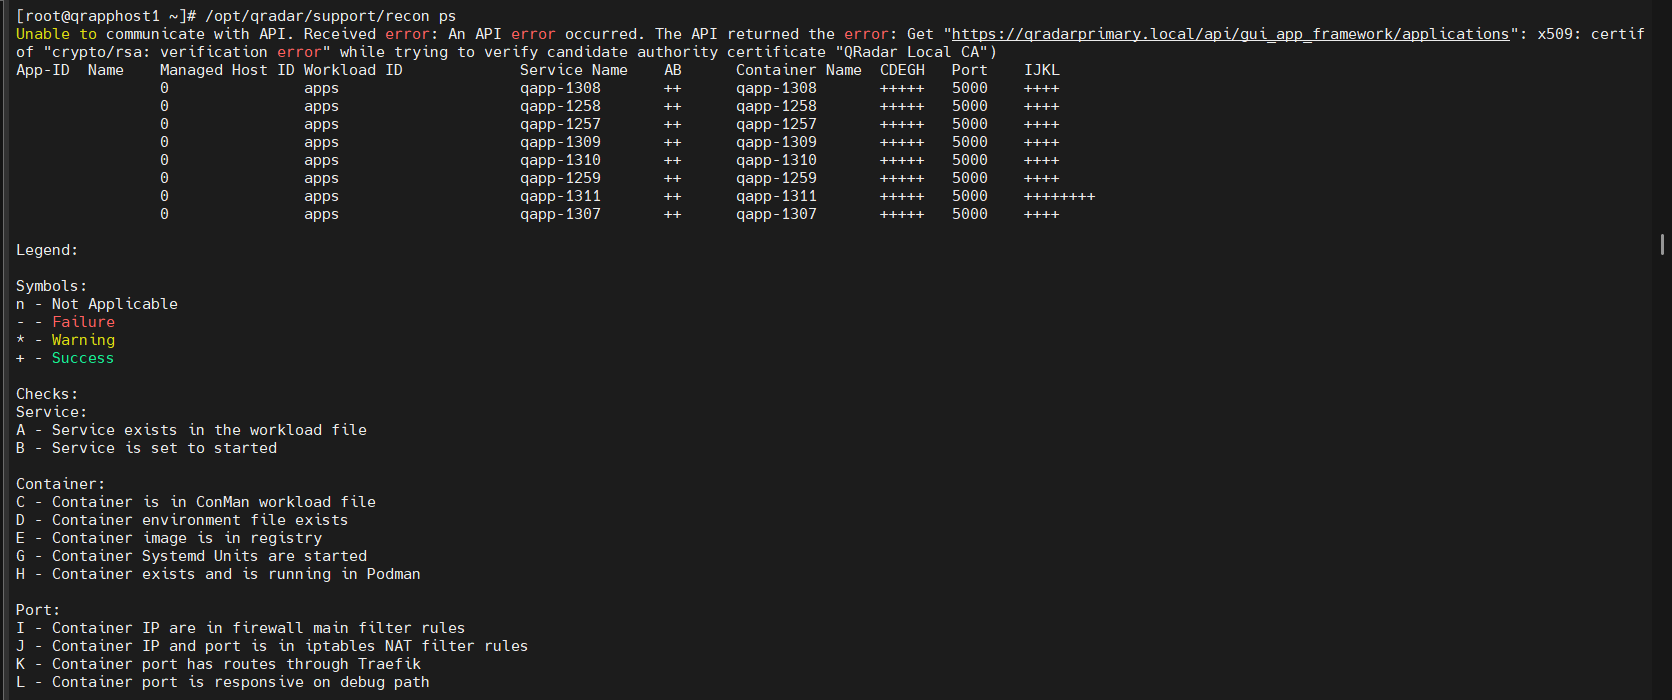
recon ps reports Unable to communicate with API. The request to https://qradarprimary.local/api/gui_app_framework/applications fails with an x509 verification error while checking the candidate authority certificate “QRadar Local CA.” The screenshot is the incident evidence, not a claim that every application status field is failing. Select the image to open it at full size.The important signal is the certificate verification error returned by the Console API request. The application table is incomplete because Recon cannot retrieve the expected application metadata from the API. Treat this first as a TLS trust-path problem, then validate the certificate identity and service health before changing the App Host.
Certificate replacement and App Host service restarts can interrupt QRadar UI access, application functions, and potentially event/flow collection during related service restarts. Back up the current certificates and keys, confirm the actual certificate chain, schedule an approved change window, and follow the procedure for the installed QRadar release. Do not paste the entire recovery sequence into production without validating each path and service name.
2. What the error points to
The error indicates that the App Host's application request could not establish trust in the certificate authority presented along the Console API path. In this case, the message names QRadar Local CA. A certificate update can expose this mismatch when the Console certificate or CA chain changes but the corresponding trust on the App Host is stale or incomplete.
- Trust-chain mismatch: the App Host does not trust the CA that issued the Console certificate, or the required intermediate certificate is missing.
- Hostname mismatch: the hostname used in the API URL is not listed in the certificate's Subject Alternative Name (SAN). Modern TLS clients should not rely on a legacy Common Name alone.
- Incorrect certificate material: the certificate and private key do not match, the certificate is expired, its format is wrong, or the wrong certificate has been installed as a trust anchor.
- Stale runtime trust: the host's trust store may have been updated while the application runtime or proxy still needs to reload the certificate state.
QRadar 7.5.0 UP8 and later uses Podman for the application container runtime. IBM's certificate-installation guidance specifically calls out restarting Podman on the host running applications after a certificate change. The Console-to-App Host path also uses QRadar's application services and proxy components, so confirm the actual version and topology before applying a restart.
3. Start with read-only checks
Record the QRadar version, hostnames, certificate update time, and whether the issue affects all apps or only one. Use the exact FQDN configured in your environment in place of qradarprimary.local if different.
# Record the installed QRadar version
/opt/qradar/bin/myver -v

# Confirm that the Console hostname resolves as expected
getent hosts qradarprimary.local

# Inspect the certificate presented by the Console
openssl s_client -connect qradarprimary.local:443 \
  -servername qradarprimary.local -showcerts </dev/null 2>/dev/null \
  | openssl x509 -noout -subject -issuer -dates -ext subjectAltName
Check that the certificate is currently valid, its issuer is expected, and the SAN contains the hostname actually used by the API request. The command above displays the server-presented leaf certificate; it does not prove that the leaf certificate is a root CA. Obtain the actual root and any intermediate CA certificates from the correct source before adding trust anchors.
On the App Host, use the certificate-verification procedure documented by IBM Support for your exact QRadar release. For QRadar 7.5.0 UP8 and later, IBM provides a certificate audit of files under /etc/conman/tls, /etc/traefik/tls, /etc/podman/tls, /etc/httpd/conf/certs, and the system trust anchors. Preserve the output and compare the reported failures with the Console's actual certificate chain; do not delete files just because they appear in the audit.
A certificate can be signed by a trusted CA and still fail hostname verification if the hostname is missing from its SAN. Conversely, a SAN-correct certificate can fail if the App Host does not trust its issuing CA. Validate both conditions.
4. Correct the certificate and trust chain
Use the option that matches the certificate model in your deployment. The following is the controlled recovery approach; the precise certificate files and prompts depend on whether the Console uses the QRadar Local CA, an internal CA, or a public CA.
- Back up before changing anything. Preserve the current Console certificate, private key, CA/intermediate certificates, relevant App Host TLS files, and their permissions in an approved backup location. Do not overwrite the only copy of the working or previous certificate material.
- Confirm the server certificate. It must be valid for the Console FQDN used by the API. Ensure its SAN contains the required DNS name (and IP address only if clients actually connect by IP). Confirm the certificate and private key are a matching pair.
- Install using QRadar's supported tool. IBM documents
/opt/qradar/bin/install-ssl-cert.shfor installing the Console certificate. Follow its prompts and release-specific instructions; use the documented intermediate-chain option when required. - Trust the issuing CA on the App Host. Copy the correct root CA and any required intermediate CA certificates to the approved trust locations and run
update-ca-trustas directed by IBM. Repeat trust updates on the hosts that need to validate the certificate. Do not treat a normal server/leaf certificate as a CA trust anchor unless it is intentionally a self-signed CA and that trust model is explicitly approved. - Remove stale material only when identified. If an obsolete cached certificate is blocking verification, confirm its exact path and role, preserve a backup, then follow the approved IBM procedure for removing or replacing it. Avoid broad wildcards or moving certificates without first identifying their purpose.
Case-specific option: generate a SAN-enabled self-signed certificate
The incident notes used a locally generated certificate with the Console FQDN in its SAN. Use this path only if your organization's certificate policy explicitly permits a self-signed Console certificate. For production environments that require a CA-issued certificate, generate a SAN-enabled CSR and have it signed by the approved internal or public CA instead.
Build the certificate in a staging directory rather than overwriting the live certificate files directly. Replace the example hostname with the exact FQDN used by QRadar; set the validity period to your policy.
mkdir -p /root/qradar-cert-recovery
cat > /tmp/qradar_san.cnf <<'EOF'
[req]
default_bits       = 2048
distinguished_name = req_distinguished_name
req_extensions     = v3_req
x509_extensions    = v3_req
prompt             = no

[req_distinguished_name]
CN = qradarprimary.local

[v3_req]
basicConstraints = critical,CA:FALSE
keyUsage = critical,digitalSignature,keyEncipherment
extendedKeyUsage = serverAuth
subjectAltName = @alt_names

[alt_names]
DNS.1 = qradarprimary.local
EOF

openssl req -x509 -nodes -days 365 -newkey rsa:2048 \
  -keyout /root/qradar-cert-recovery/cert.key \
  -out /root/qradar-cert-recovery/cert.cert \
  -config /tmp/qradar_san.cnf
Inspect the generated certificate before installing it:
openssl x509 -in /root/qradar-cert-recovery/cert.cert \
  -noout -subject -issuer -dates -ext subjectAltName
Then use /opt/qradar/bin/install-ssl-cert.sh and follow the prompts for the staged certificate and key. Do not manually overwrite /etc/httpd/conf/certs/ as a substitute for the supported installer.
Update App Host trust carefully
After the Console certificate is installed, inspect the certificate actually presented by the Console from the App Host and write it to a temporary file first:
openssl s_client -connect qradarprimary.local:443 \
  -servername qradarprimary.local -showcerts </dev/null 2>/dev/null \
  | openssl x509 -outform PEM \
  -out /tmp/qradar_console_presented.pem

openssl x509 -in /tmp/qradar_console_presented.pem \
  -noout -subject -issuer -dates -ext subjectAltName
If the certificate is self-signed (subject and issuer match) and this is explicitly the approved trust model, install that certificate as a trust anchor on the App Host. Otherwise, install the actual issuing root CA and any required intermediates—not the leaf/server certificate—as directed by your certificate authority and IBM's procedure.
# Only for an approved self-signed certificate
install -m 0644 /tmp/qradar_console_presented.pem \
  /etc/pki/ca-trust/source/anchors/qradarprimary_actual.crt
update-ca-trust extract
Back up and preserve old certificate files before retiring them. If an obsolete file such as /etc/pki/tls/certs/qradarprimary.local.crt is involved, confirm its purpose and follow the supported procedure before moving or removing it. Do not silently hide command failures or replace trust material based only on a filename.
5. Reload the App Host runtime only after trust is corrected
Once the Console certificate and App Host trust store are correct, reload the runtime according to the supported procedure for the installed QRadar release. IBM documents the following Podman restart on the host running applications after certificate changes:
systemctl restart podmanThis restarts the application container runtime and can temporarily affect applications on that host. Schedule it, confirm the host role, and follow IBM's guidance for your exact version.
In the incident documented here, the team also recycled the App Host's runtime/proxy services after updating certificate trust. The wider sequence below is case-specific; do not use it as a generic first-line command block or assume those services have identical dependencies in every deployment.
# Case-specific sequence used after certificate/trust repair
# Run only if confirmed for the installed release and approved change window
systemctl stop traefik conman podman podman.socket

# Start in the approved sequence for this host
systemctl start podman conman traefikRecycling services does not repair an invalid certificate, missing CA, or hostname/SAN mismatch. If the trust chain is still wrong, the API error can return after the restart.
6. Verify the API and application state
After the services settle, run Recon again on the Console or App Host as supported by your deployment:
/opt/qradar/support/recon psConfirm all three outcomes:
- The output no longer starts with
Unable to communicate with APIand no longer reports the x509 “QRadar Local CA” verification error. - Application names and IDs populate normally, rather than leaving the metadata columns blank.
- The service, container, and port status markers are positive for the applications expected to be running. Investigate any individual failures separately; an API recovery does not prove every app is healthy.
If the same error remains, preserve the full Recon output and the version-appropriate certificate-verification results from the App Host. Collect the application logs specified by IBM Support and escalate rather than repeating certificate deletion or runtime restarts.
7. IBM references
- IBM Documentation — Installing a new SSL certificate in QRadar
- IBM Documentation — Creating a multi-domain SAN certificate signing request
- IBM Support — Collecting QRadar logs and verifying application certificates
- IBM Documentation — QRadar port usage (Console and App Host application traffic)
- IBM QRadar 101 — Application troubleshooting and certificate guidance
This write-up records one resolved environment and a diagnostic pattern, not a universal certificate runbook. Certificate paths, service topology, and supported recovery steps can vary by QRadar version and deployment. Follow the current IBM procedure and your change-control process before making production changes.
App Host API errors, TLS trust, and QRadar application recovery
For technical discussion about QRadar certificate validation and App Host troubleshooting, contact me using one of the options below.
8. Resolution: Recon output after recovery